Guide
How to use the Jam Track Player
The Jam Track Player plays a backing track on a loop while a fretboard and a chord chart follow along. The chart shows where you are in the song. The fretboard shows where to play: a scale shape on the neck, with the notes of the chord that's sounding right now lit up as targets.
You can loop any few bars, slow a track down without changing its pitch, and choose how the fretboard follows the chord changes. This guide covers playing and looping first, then what the fretboard shows and how to practice with the track paused, then the rest of the settings.
Three tracks are free for everyone: the E7 Vamp, the Andalusian Cadence, and the Stairway Jam. The rest open with a Silver or Gold membership (the list shows which), and the tracks from a course also come with that course. The picker lists every track. One you can't open yet is grayed out.
1. Playing a track
The player lives at fretscience.com/tools/jamtrack.
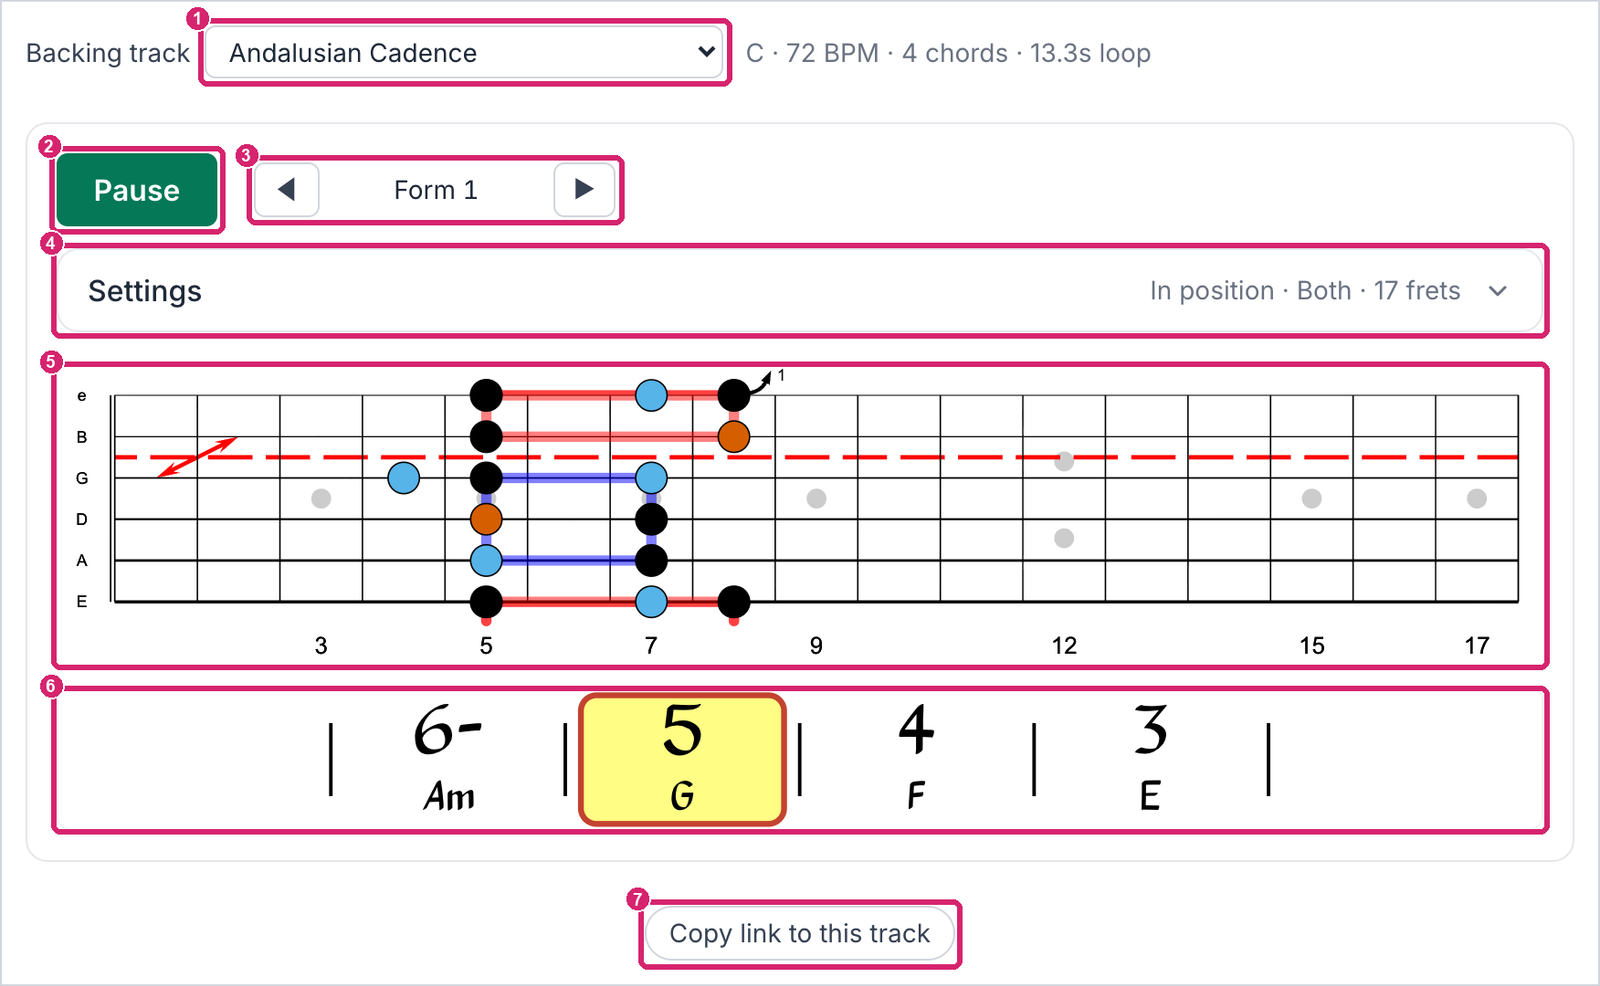
① The backing track. ② Play and Pause. ③ Move the scale shape along the neck. ④ Settings, with the current setup in one line. ⑤ The fretboard. ⑥ The chord chart. ⑦ A link to this setup.
Choose a track under Backing track, and press Play. Next to the picker is a line about the track: its key, its tempo, how many chords it has, and how long one time through takes. The track loops until you stop it.
The chord chart highlights the chord that's playing, and on a long chart it scrolls to keep the current line in view. Click any chord to jump to it, whether the track is playing or paused (section 4). Each chord shows its name, its number in the key, or both (section 5). Here, in the key of C, G is the 5 chord and Am is the 6- (the minus sign means minor).
You can also play from the keyboard. Click anywhere on the player first. Then the space bar plays and pauses, and on a track with sections (below), the left and right arrow keys jump to the previous or next one.
2. Looping a hard spot
To work on a few bars, drag across them in the chart. The player loops just those bars, and the row at the top of the player says how many.
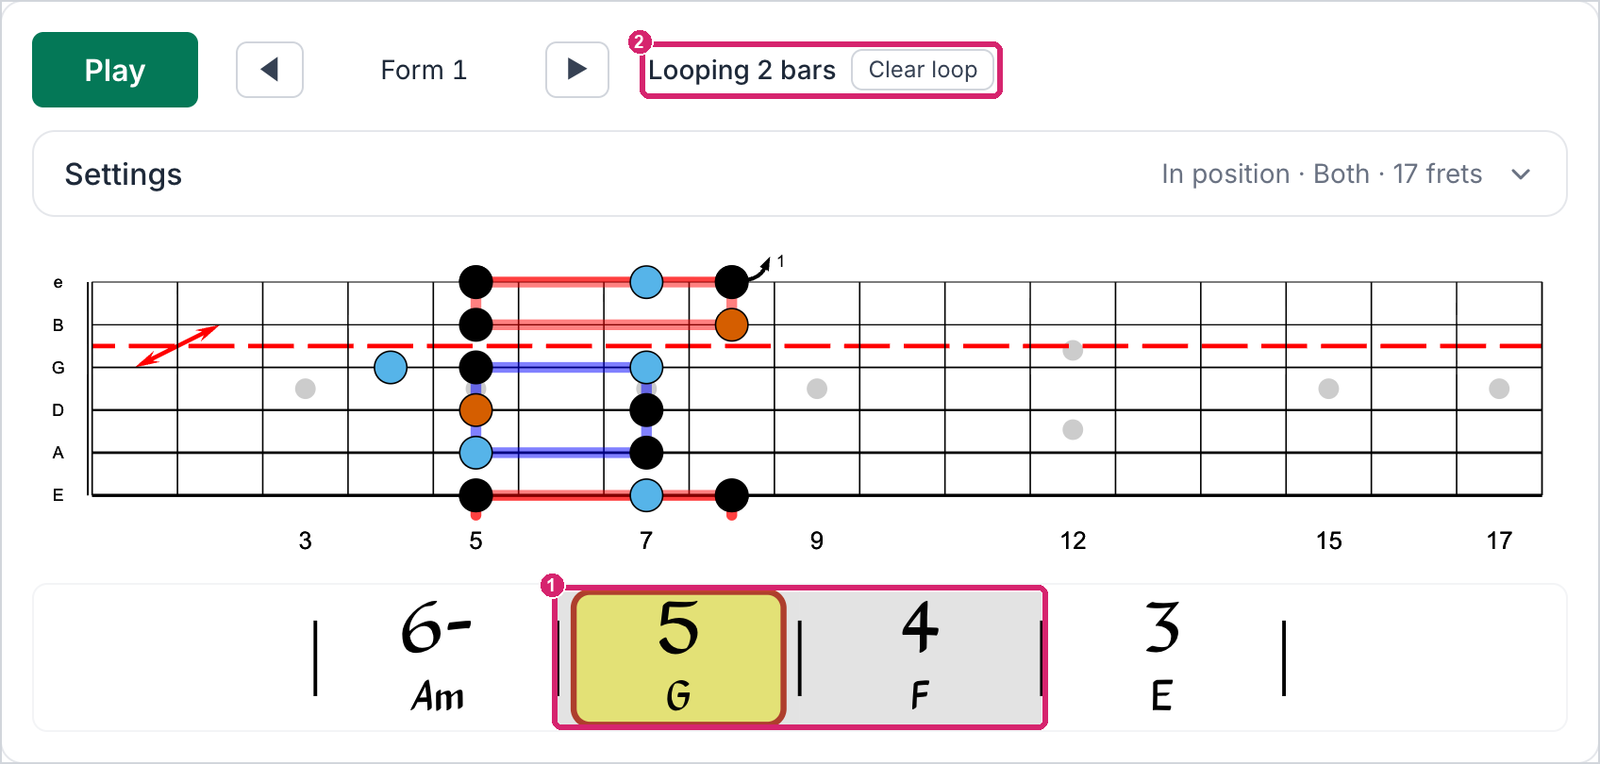
① The looped bars, shaded. ② How long the loop is, and Clear loop.
Clear loop goes back to the whole track. Clicking a chord outside the loop clears it too.
Longer tracks are split into sections, and the chart names each one at the start of its line, with a ⟳ button next to the name. Click the name to jump to that section. Tap ⟳ to loop the whole section, every time through it included. A row of buttons under the fretboard shows the track's form, one button for each time through a section, with the one that's playing lit up. Click any of them to jump there.
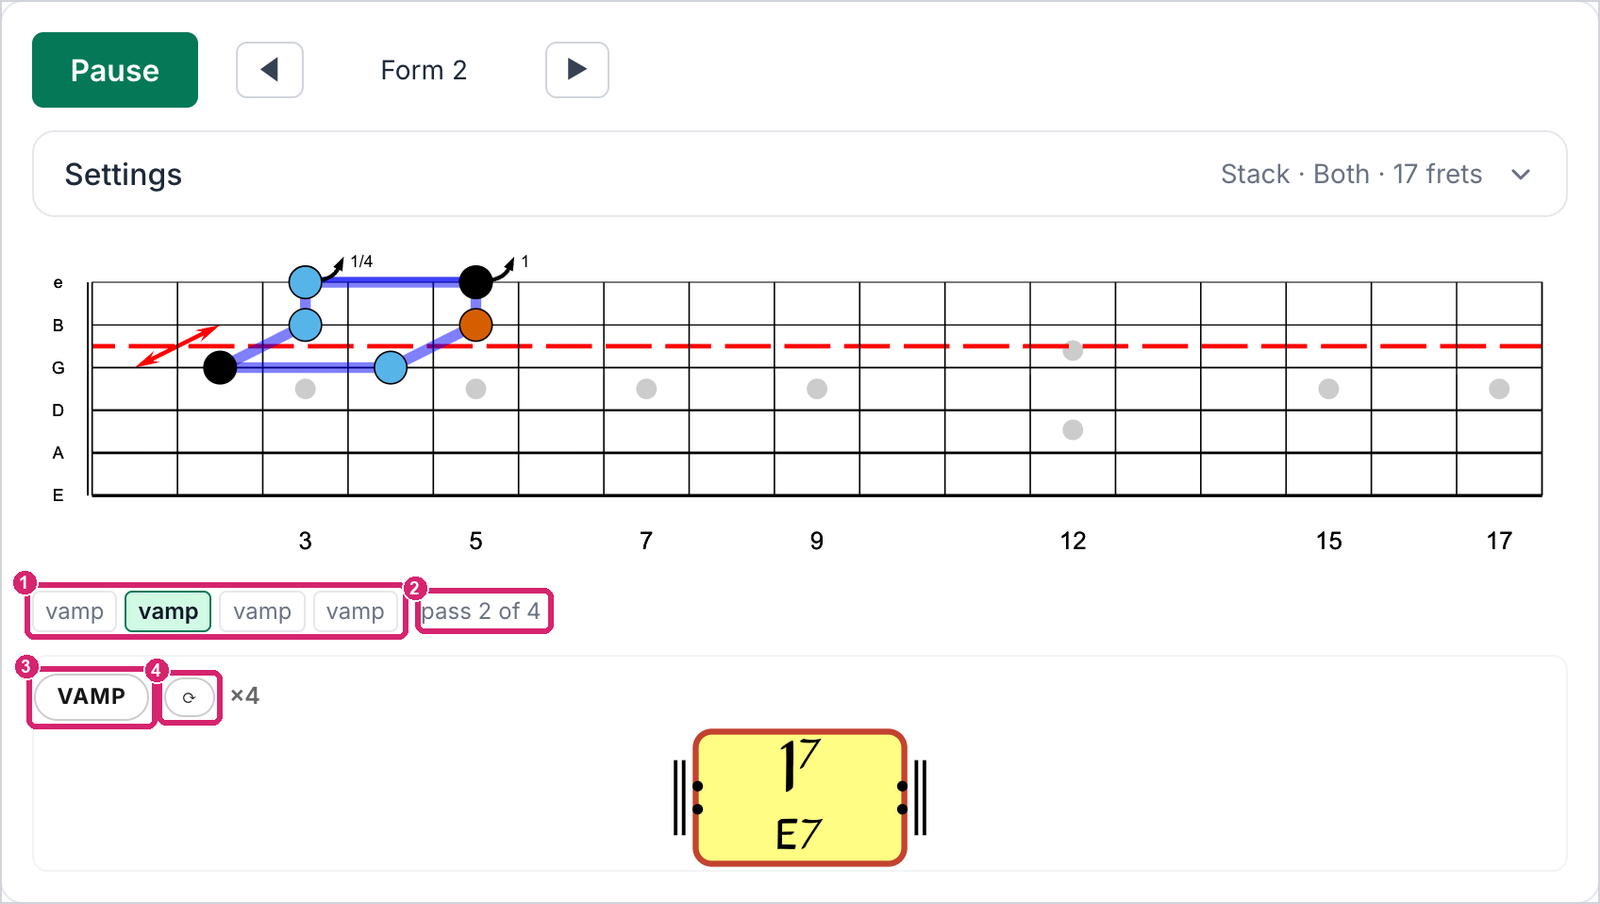
① The form, one button for each time through. ② Which time through this is. ③ The section's name: click it to jump there. ④ Loop this section.
To slow a track down, open Settings and drag Tempo under Playback. The pitch stays the same at any speed. On most tracks the slider runs from 70% to 120% of the recorded tempo, and the label next to it shows the percentage and the beats per minute. It becomes active a moment after you first press Play, while the player loads what it needs to change speed.
Count me in plays a bar of clicks before the music starts. With it on, every Play counts you in and starts from the beginning of the bar you're in, so you always come in on a downbeat. Volume sets the track's level against your guitar, and your device remembers it.
3. Reading the fretboard
The fretboard shows one scale shape at a time and marks the chord that's playing on top of it. Here the track is on the G chord, and the scale is A minor pentatonic.
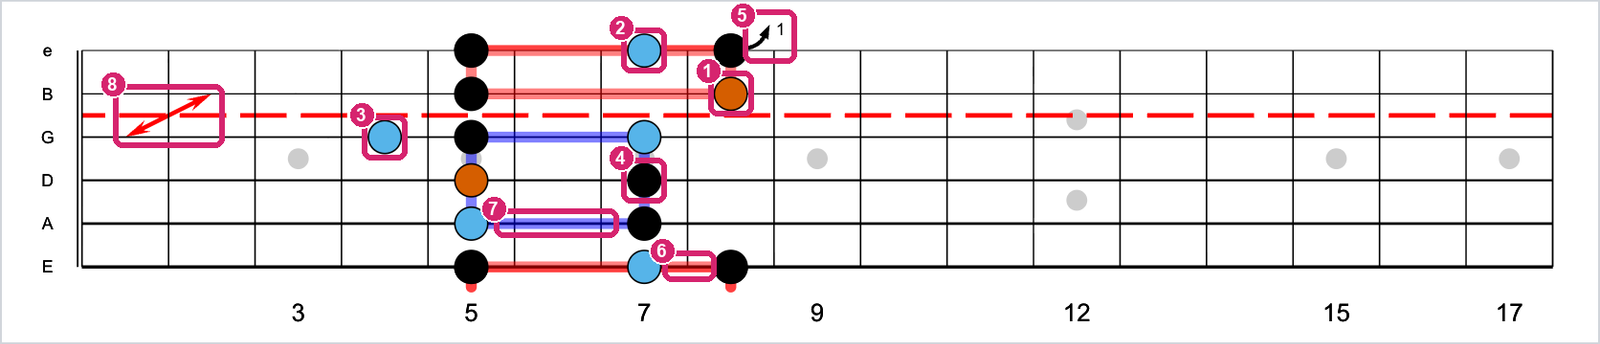
① The root of the chord that's playing. ② One of the chord's other notes. ③ A chord note just outside the shape. ④ The rest of the scale. ⑤ A bend that reaches a chord tone. ⑥ The rectangle. ⑦ The stack. ⑧ The shift between the G and B strings.
The root of the current chord is red, and the chord's other notes are light blue. Those are your targets. The black notes are the rest of the scale, the notes you travel through on the way from one target to the next. If your screen is in dark mode, the board uses lighter colors: the red looks orange, and the black notes are cream.
Targets don't have to be in the scale. G's 3rd is B, a note A minor pentatonic doesn't have, so the board adds it where your hand can reach it, inside the shape or a fret outside it.
A curved arrow with a number marks a note to bend up to a target: 1 for a whole step (two frets), 1/2 for a half step, and 1/4 for the slight bend blues players put on the minor third. In the screenshot, the C on the high E string bends a whole step up to D, the 5th of G. All bends shown in the player will land on a chord tone target.
The red and blue bars outline the two shapes the course builds each pentatonic position from: the rectangle and the stack. The dashed red line marks the shift between the G and B strings, where every shape moves up a fret.
The arrows on either side of Form 1 move the shape to the next form along the neck. Under View in Settings, Method chooses the shape: In position shows a whole position (rectangle and stack together). Rectangle and Stack show one box. Diagonal shows a pattern that travels up the neck.
Targets, also under View, chooses how much of each chord to mark. Triad marks the root, 3rd, and 5th. All chord tones adds the 7th when the chord has one, such as the ♭7 of a dominant seventh chord. A few tracks, like the modal vamps, mark no targets, so they don't offer the choice.
4. Practicing out of time
You don't have to keep up with the track to use the player. Leave it paused and click a chord in the chart. The fretboard jumps to that chord and shows its targets, the same picture it shows when the track gets there, and nothing plays. You can stay on that chord as long as you like.
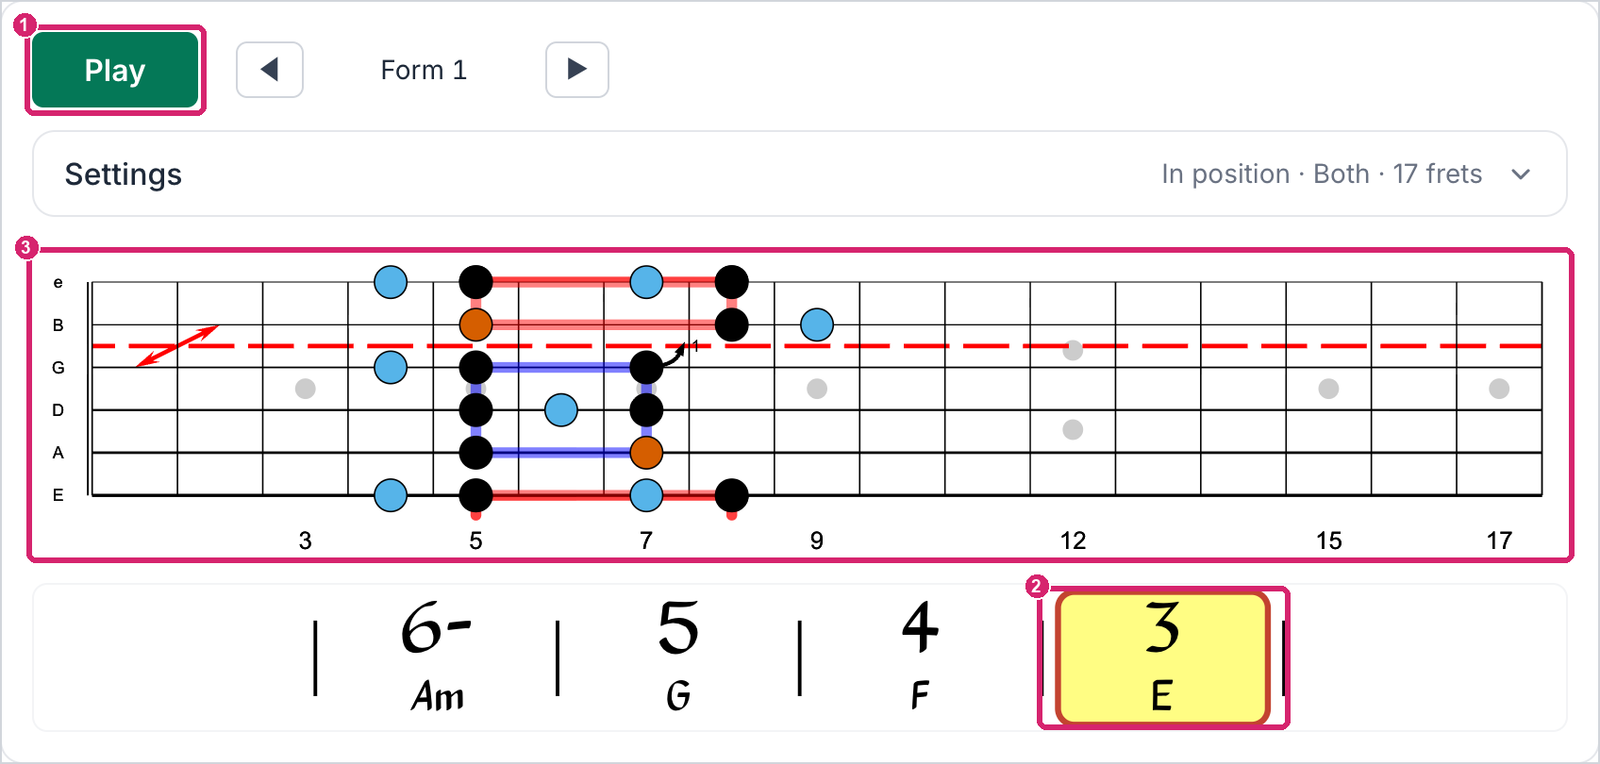
① Still paused. ② The chord you clicked. ③ Its targets on the board.
Here the player is paused on E, the last chord of the Andalusian Cadence. E's 3rd is G♯, which A minor pentatonic doesn't have, so the board shows where it sits around the shape. The arrow on the G string marks a whole-step bend from D up to E, the chord's root.
This is a good way to learn a new track, or a change that keeps getting away from you. Click a chord, find its targets under your fingers, and play them at your own pace. Then click the next chord and work out how to get from one chord's targets to the next. The arrows next to Form 1 and everything in Settings still work while the track is paused, so you can look at the same chord in another position or with another choice of Scales. When the changes feel familiar, press Play, and the track starts from the chord you clicked.
5. Settings
Most of the controls are in the Settings panel. Click it to open it, and the line next to the word Settings sums up how it's set while it's closed.
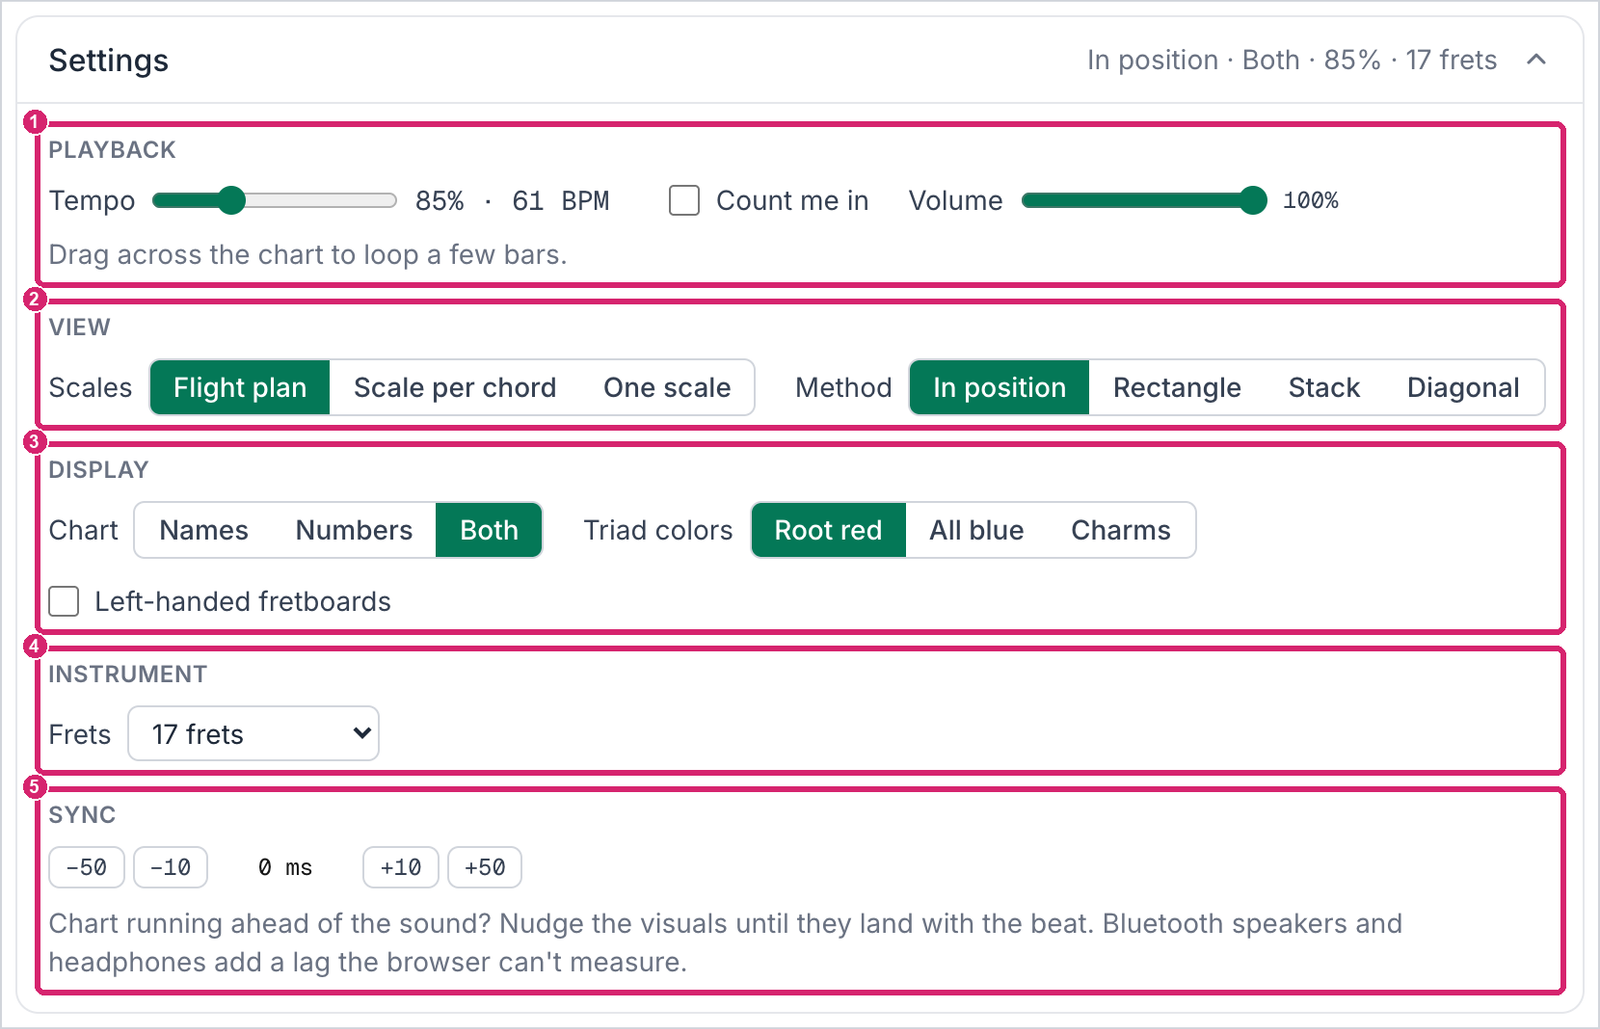
① Playback: tempo, count-in, and volume. ② View: how the fretboard follows the chords, the shape, and the targets. ③ Display: the chart's labels, the target colors, and left-handed fretboards. ④ Instrument: how much of the neck to show. ⑤ Sync.
Chart chooses the chord labels: Names, Numbers, or Both. Numbers show each chord's place in the key, so the same progression reads the same way in every key. In the Andalusian Cadence, in C, Am, G, F, and E read 6-, 5, 4, and 3.
Triad colors chooses how the targets are drawn. Root red is the root in red and the other chord notes in light blue. All blue draws every chord note in light blue. Charms gives each chord note its own mark: the root red, the 3rd a green diamond, the 5th a blue square, and the 7th, when it's a target, yellow.
Left-handed fretboards flips the board. It's the same left-handed setting the rest of the site uses.
Frets shows 12, 15, 17, 22, or 24 frets, or Fit to the form, which shows only the frets the current shape covers plus one on either side. Fit to the form works well on a phone. Your device remembers the choice.
Sync is for Bluetooth speakers and headphones, which play the sound a fraction of a second late in a way the browser can't measure. If the chart changes chords before you hear the change, nudge the visuals with the Sync buttons, 10 or 50 milliseconds at a time, until the changes land with the beat. Your device remembers this one too.
6. Following the changes
Scales, under View, chooses how the fretboard follows the chords:
- One scale keeps one scale shape the whole way through. Only the targets change from chord to chord, so your hand stays in one place while you learn which notes of that scale belong to each chord.
- Scale per chord switches to each chord's own pentatonic scale as the chords change. It stays in the same part of the neck, so your hand doesn't have to jump.
- Flight plan appears on tracks that come with a plan from the lessons: a scale to play over each chord. The plan sits under the chart, with one menu per chord.
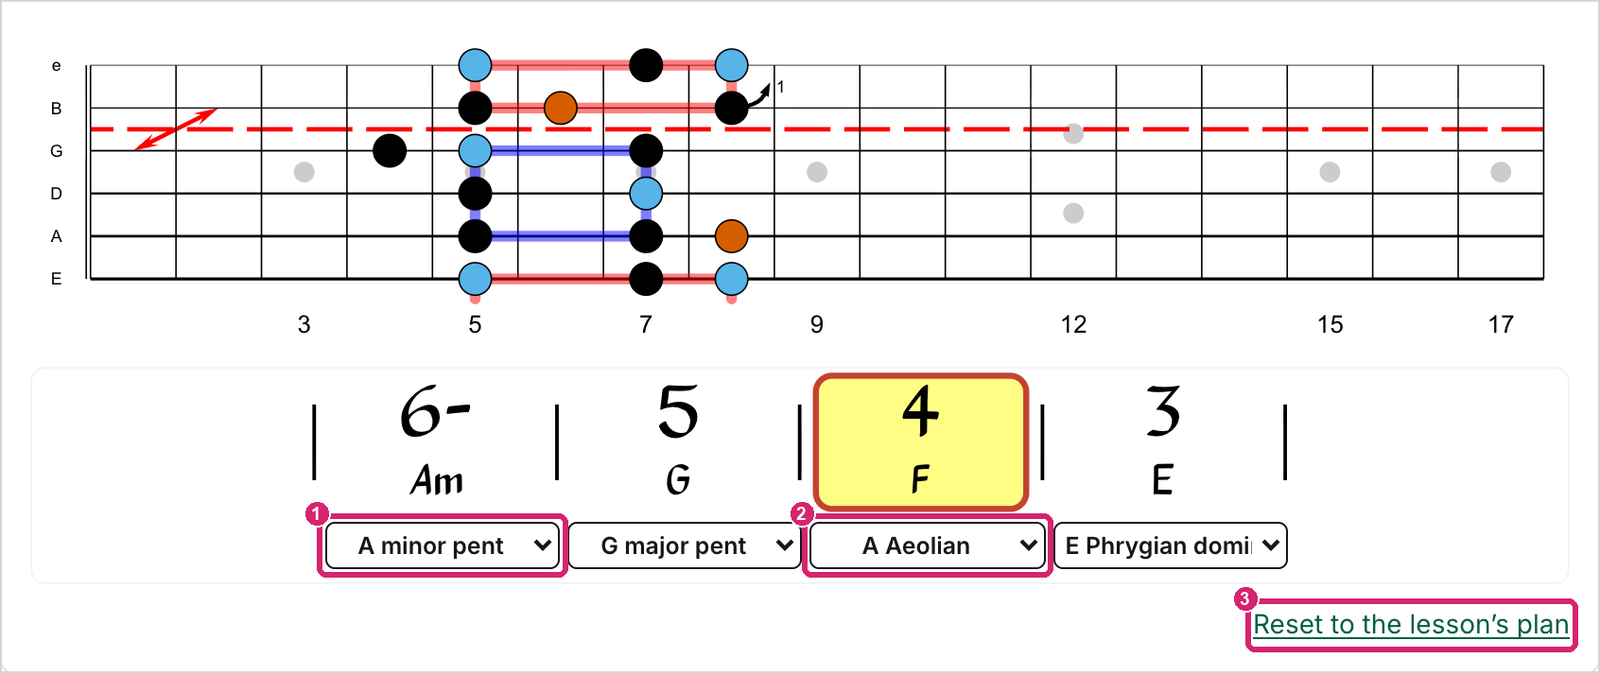
① The plan's scale for Am. ② The scale for F, changed from F major pentatonic to A Aeolian. ③ Back to the lesson's plan.
Change any menu to try a different scale over that chord, and the fretboard follows. In the screenshot, the F chord now uses A Aeolian, and the board shows A Aeolian with F's notes as the targets. Reset to the lesson's plan puts the lesson's choices back.
A one-chord vamp, like the E7 Vamp, has a Scale menu next to Scales instead. The lessons work the same vamp with more than one scale, the minor pentatonic and then the major, and the menu switches between them.
7. Saving and sharing a setup
The page's address keeps the track and how you've set it up: the tempo, the loop, the scales, the method, the targets, the chart labels, the target colors, and the count-in. A bookmark brings the same setup back. Copy link to this track, under the player, copies that address so you can paste it into your notes or send it to a student. The shape's position along the neck, the volume, and the sync setting aren't part of the link. If you use the Practice Planner, Add to practice in the same row saves the setup as a practice item.
Below that, Related lessons lists the lessons that use the track you've picked. Each one explains what to practice over the track.
If something doesn't work the way this guide says, let me know. When you're signed in, the Feedback button in the bottom corner of every page comes straight to me; otherwise, use the contact page.