Blog ·
3nps: One pattern to rule them all
You can learn the 7 modes of the major scale across the fretboard in minutes. Here’s how.
When guitarists talk about “the modes”, they are referring to a set of scales made from a fixed pattern of whole- and half-step intervals: whole-whole-half-whole-whole-whole-half (or, represented as numbers of half-steps, 2-2-1-2-2-2-1). This parent scale is shown in Figure 1. In all of the diagrams in this article, the numbers in the note markers represent the scale degree within the major scale. So in the C major scale, 1 corresponds to the note C, 2 corresponds to D, 3 is E, and so on.
![]()
FIgure 1: The major scale is a sequence of intervals (2-2-1-2-2-2-1) that repeats every 12 frets/semitones
The 7 modes are created by starting and ending each scale on a different scale degree, and they are commonly known by their Greek names. The Ionian or major scale starts and ends on scale degree 1. The Dorian scale starts and ends on scale degree 2. Phrygian starts and ends on 3, Lydian on 4, Mixolydian on 5, Aeolian (aka natural minor) on 6, and Locrian on 7.
“3nps” stands for three notes per string. In the 3nps system, the parent scale pattern is broken up into three note subsequences, as shown in Figure 2.
![]()
![]()
![]()
![]()
![]()
![]()
![]()
![]()
Figure 2: The parent scale pattern contains seven three-note subsequences, which in turn are made from just three different fingering patterns
If we rearrange these sequences, it’s easy to see that there are only three fingering patterns. If we think of each of these patterns as occupying a five fret span (except for pattern 4, which gets 6 frets), and if we call each pattern by the scale degree of the first note in the pattern, we can recreate a scale on one string by sequencing the patterns in the the repeating order 7 - 3 - 6 - 2 - 5 - 1 - 4 (for the mathematics geeks, this is counting by 3’s mod 7). Conveniently, the three fingering patterns group together, with three copies of the “1-3-5” pattern, two copies of the “1-3-4” pattern, and two copies of the “1-2-4” pattern.
![]()
![]()
![]()
![]()
![]()
![]()
![]()
Figure 3: The seven three-note subsequences of the parent scale
If we imagine a stringed instrument with many more than six strings, all tuned in perfect fourth (5 semitone) intervals, this same sequence repeats over and over across the strings, as shown in Figure 4. We’ll call this the “grand unification” pattern.
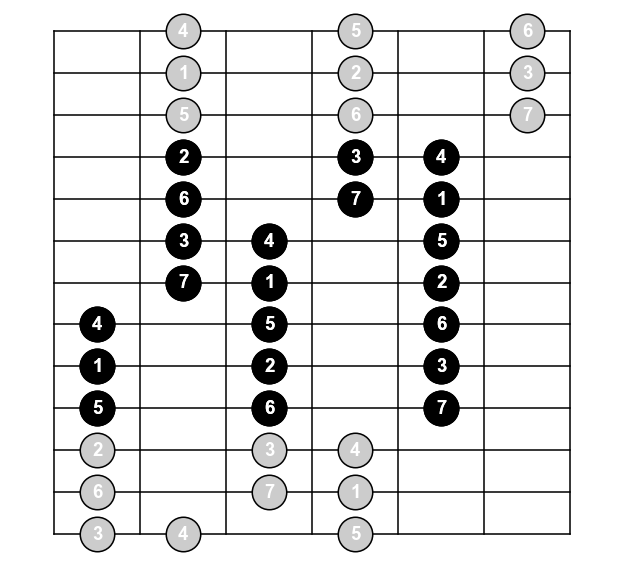
Figure 4: The "grand unification" pattern
By starting on the low E string with each of these patterns in turn, and by taking into account the major 3rd interval between the G and B strings (see: the geometry of standard tuning), we get seven different scale patterns. These are often (and incorrectly) referred to by their Greek modal names.
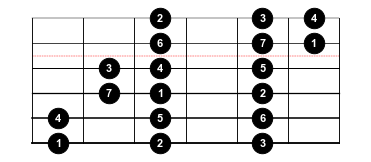
Figure 5: Pattern 1, aka the "Ionian" 3nps shape

Figure 6: Pattern 2, aka the "Dorian" 3nps shape
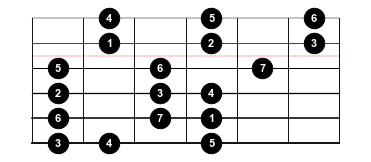
Figure 7: Pattern 3, aka the "Phrygian" 3nps shape

Figure 8: pattern 4, aka the "Lydian" 3nps shape
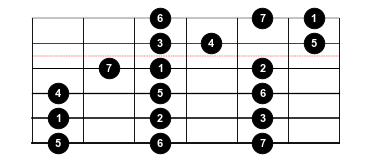
Figure 9: Pattern 5, aka the "Mixolydian" 3nps shape
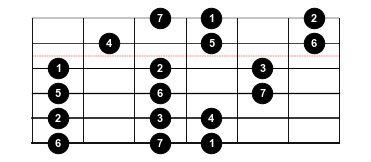
Figure 10: Pattern 6 aka the "Aeolian" 3nps shape
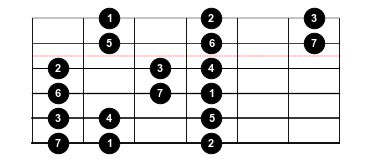
Figure 11: Pattern 7 aka the "Locrian" 3nps shape
It’s only correct to call these patterns by their Greek names if you are treating the first note on the low E string as the root of the scale.
Instead of thinking of these patterns that way, you should learn to start your scales on any string and with any finger. When you are making music, you will never start on the low E string and play a scale linearly up 2.5 octaves and back down, so don’t practice them that way.
Indeed, and I can’t stress this enough, you should practice your scales with roots on each of the 6 strings, and under each of your fingers!
Let’s walk through a couple of examples.
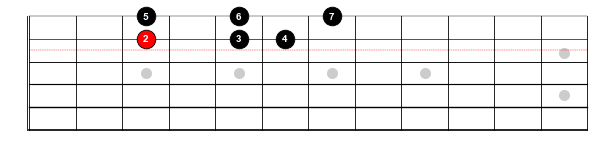
Example 1: D Dorian, second string root
Let’s say I wanted to build a D Dorian scale around the D note on the B string. The dorian scale starts on the second scale degree of the parent scale, so we’ll start by placing pattern 2 on the D note at the third fret of the B string:

To continue ascending the scale from there, we follow the grand unification pattern’s cycle (2-5-1-4-7-3-6) on to the upper strings, in this case placing pattern 5 on the E string:
To continue the scale descending from our seed, we reverse the sequence (2-6-3-7-4-1-5), and we take into account the G-B string gap by shifting one fret toward the nut:
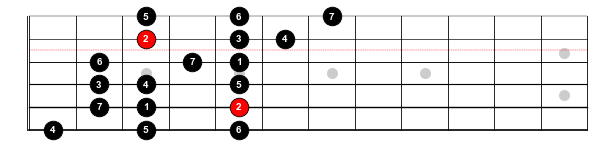
And we get the D dorian scale across all six strings. And if you play a 7-string guitar, it’s trivial to extend the scale by adding pattern 1 at the first fret of the low B string.
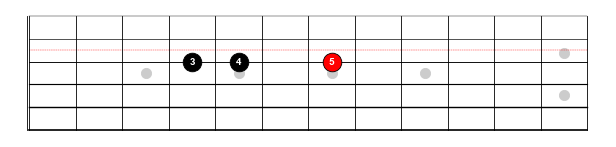
Example 2: D Mixolydian, third string root
Now, let’s say that we had our third finger on the D note at the 7th fret of the G string and we wanted to construct a D Mixolydian scale there. Since the Mixolydian scale starts with the fifth scale degree of the parent scale, and our third finger is there, we want the pattern that ends with scale degree 5. So we place pattern 3 so that it ends on the D note at the 7th fret of the G string:
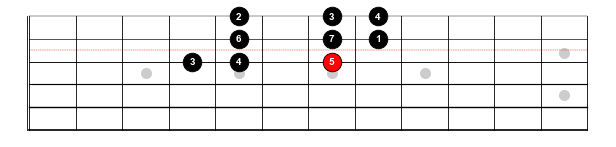
To ascend the scale, we follow the sequence starting with pattern 3 (3-6-2-5-1-4-7), and adjust one fret toward the bridge since we’re crossing from the G to the B string:
To descend the scale, we reverse the sequence (3-7-4-1-5-2-6):
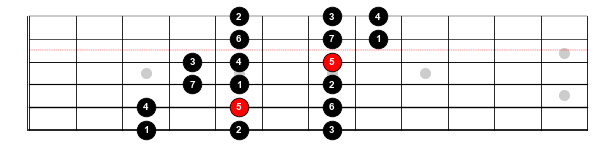
And again, if you are playing a 7-string guitar, you can easily extend the pattern by placing pattern 5 at the third fret of the low B string.
Exercise
If you have Dungeons & Dragons dice laying around, you can make a game of this and add some randomness to your practice:
- Roll a D12 to choose your root pitch (1=C, 2=C#, 3=D, …, 12=B)
- Roll a D6 to choose your mode (1=Ionian, 2=Dorian, …, 6=Aeolian [this ignores Locrian, which is totally fine, trust me])
- Roll a D20 to chose the approximate starting fret for your index finger
- Move your index finger to the indicated fret, and find your root note in the four fret span under your fingers
- Build the required scale from there, playing up to the high E string, all the way down to the low E string, and then back to the root
This is great practice for shifting positions while improvising!
Tagged: 3nps, 7-string, diatonic modes, guitar, modes, scales
Get new lessons by email
Enjoyed this? Subscribe for new Fret Science lessons and fretboard insights — no spam, unsubscribe anytime.