Blog ·
Triad geometry
Triads are among the most useful patterns to learn on the fretboard, but the usual way of memorizing them as 36 different patterns is harder than it needs to be. By understanding how they work, you will only need to memorize 3 patterns, and you can easily reconstruct the rest.
A triad is made by stacking two intervals, each of which is a minor or major third, to make a chord. As a reminder, a major third is equivalent to two whole steps (a four fret span), and a minor third is three half steps (a three fret span).
A major triad is made by stacking a minor third on top of a major third. When you do that, the lowest note is the root, and the top note is a perfect fifth (7 semitones/frets) above the root. On a single string, it looks like this:
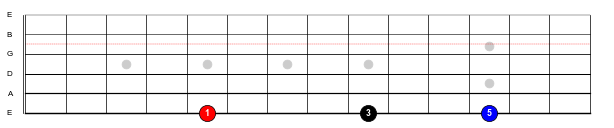
Figure 1: A major triad, root position, on the 6th string
In root position, the notes are ordered 1 (root), 3 (major third), and 5 (perfect fifth) from low to high, but you can change the ordering and still keep all the notes inside an octave span. If you move the root from the bottom to the top of the stack, you get first inversion, and if you subsequently move the third to the top of the stack, you get second inversion.
On each group of three adjacent strings, there is one playable fingering for each inversion, so there are three ways to play a closed-form triad on those three strings. These are the three patterns you’ll need to explicitly memorize.
Figure 2 shows these positions for the A major triad on the lowest three strings. Note that in all of these figures, the root note is colored red, the third is in black, and the fifth is in blue. Notice that the root note occurs only once on each string.
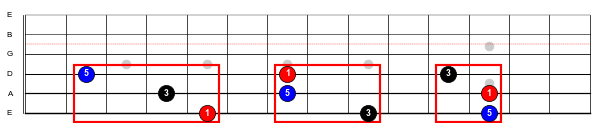
Figure 2: A major triad inversions on strings 4-6 (if you are familiar with the CAGED system, you may recognize these as being the bottom three notes of the G, D, and C shapes)
If we move these shapes up one string, we get D major triads with the same shapes:
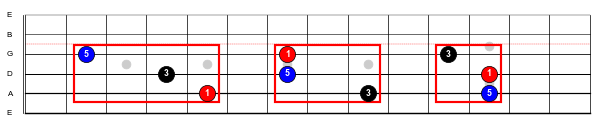
Figure 3: D major triad inversions on strings 3-5 (in the CAGED system, these are fragments of the C, G, and E shapes)
And if the guitar was tuned entirely in 4ths, that would be the end of the story. We could continue to move these shapes onto the other sets of adjacent strings. But as we move to strings 2-4, we have to cross the boundary between the G and B strings (see: The geometry of standard tuning). Any note that crosses that boundary going in this direction will shift one fret toward the bridge, resulting in the new shapes shown in Figure 4:

Figure 4: G major triad inversions on strings 2-4 (in the CAGED system, these are fragments of the E, C, and A/G shapes. They also make up a considerable fraction of Eddie Van Halen’s rhythm parts)
And the same transformation happens again as we move from strings 2-4 to strings 1-3, yielding another new set of shapes:
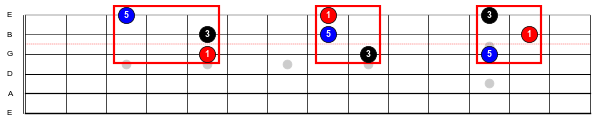
Figure 5: C major triad inversions on strings 1-3 (in the CAGED system, these are the top three notes of the A, E, and C/D shapes)
These patterns are so ubiquitous and useful that they will eventually be drilled into your memory by constant use. But if you’re just starting, remember that you only need to explicitly memorize the patterns from Figure 2. You can use your understanding of the geometry of standard tuning to recreate the others.
When learning these patterns, be sure to always remember where the root note (the red dot) is inside the pattern. The root is the most important note in the triad, and it will be the main signpost you will use to navigate the fretboard.
Minor triads
A minor triad is constructed by stacking a minor third (3 semitones) on top of a major third (4 semitones).
You can transform the major triad patterns into minor triads by moving the 3rd (the black note in the figures) down one fret. If you know where to find the root note in the pattern, notice that the third is always either one string higher or two strings lower. For your reference, here’s what you get:

Figure 6: A minor triad inversions on strings 4-6

Figure 7: D minor triad inversions on strings 3-5
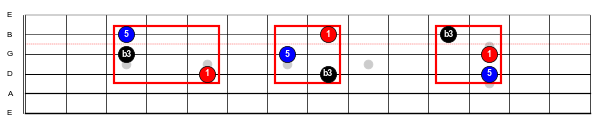
Figure 8: G minor triad inversions on strings 2-4

Figure 9: C minor triad inversions on strings 1-3
DIY Bonus: augmented and diminished triads
Diminished and augmented triads are not often used in rock and roll, so you can safely ignore them as a beginner/intermediate player.
I’ll leave these patterns as an exercise for the reader, but:
- A diminished triad is two minor thirds stacked, and you can make those patterns by lowering the 5th in the minor triad patterns one fret.
- An augmented triad is two major thirds stacked, and you can make those patterns by raising the 5th in the major triad patterns one fret.
In all of these patterns the 5th of the chord is either one string lower than the root or two strings higher.
Tagged: guitar, triads
Get new lessons by email
Enjoyed this? Subscribe for new Fret Science lessons and fretboard insights — no spam, unsubscribe anytime.